By Haji Satoshi · Published June 2026
What We’re Building
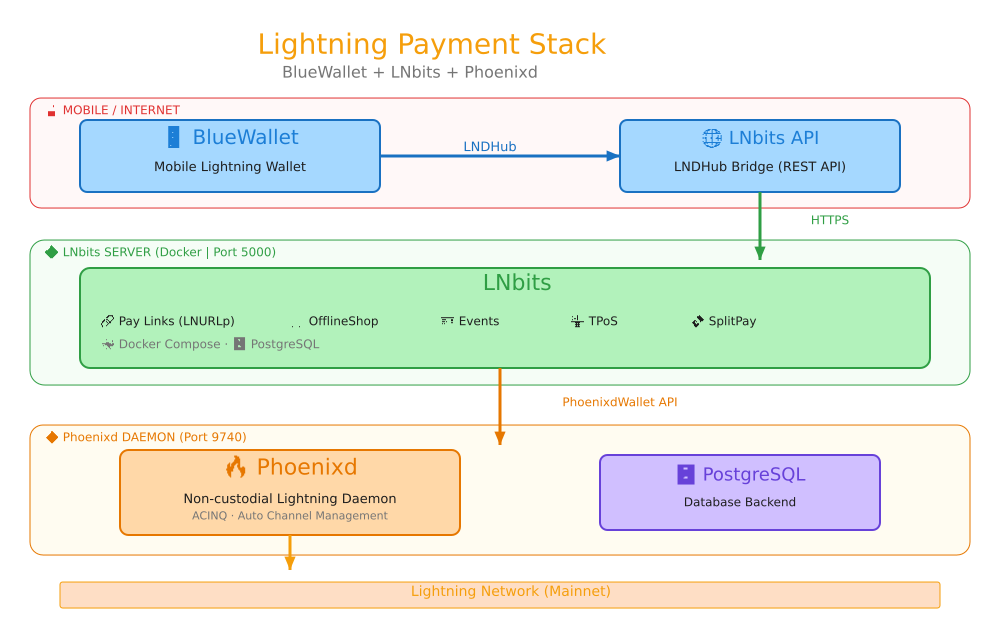
In this guide, we’ll set up a self-hosted Bitcoin Lightning payment server using three powerful open-source tools:
| Component | Role |
|---|---|
| Phoenixd | Non-custodial Lightning daemon — manages channels, liquidity, and routing automatically |
| LNbits | Multi-wallet account system with extensions (pay links, shops, ticketing) |
| BlueWallet | Mobile wallet to manage funds on the go via LNDHub |
The beauty of this stack: you control the keys. Phoenixd is non-custodial, LNbits is fully self-hosted, and BlueWallet connects over an encrypted bridge. No third-party, no KYC, no middleman.
Prerequisites
- A Linux server running Ubuntu 22.04+ or Debian 12+ (a $5-6/mo VPS with 2GB RAM works fine)
- Docker and Docker Compose installed
- A domain name pointed to your server (optional but recommended for HTTPS)
- Basic comfort with the command line
Install Docker
# Update system
sudo apt update && sudo apt upgrade -y

# Install Docker
curl -fsSL https://get.docker.com | sudo bash

# Install Docker Compose plugin
sudo apt install -y docker-compose-plugin

# Add your user to the docker group
sudo usermod -aG docker $USER

# Log out and back in, or run:
newgrp docker

# Verify
docker compose version
docker info | head -5
Step 1: Install Phoenixd
Phoenixd is a headless Lightning daemon by ACINQ — the team behind Phoenix Wallet. It’s non-custodial, manages channels automatically, and exposes a clean REST API.
# Create a directory for phoenixd
mkdir -p ~/phoenixd && cd ~/phoenixd

# Download the latest phoenixd release
PHOENIXD_VERSION=$(curl -s https://api.github.com/repos/ACINQ/phoenixd/releases/latest | grep tag_name | cut -d'"' -f4 | sed 's/^v//')
wget "https://github.com/ACINQ/phoenixd/releases/download/v${PHOENIXD_VERSION}/phoenixd-${PHOENIXD_VERSION}-linux-x86_64.zip"

# Unzip
sudo apt install -y unzip
unzip "phoenixd-${PHOENIXD_VERSION}-linux-x86_64.zip"

# Make executable and move to system path
chmod +x phoenixd
sudo mv phoenixd /usr/local/bin/

# Create data directory
mkdir -p ~/.phoenix
Create systemd service
sudo tee /etc/systemd/system/phoenixd.service > /dev/null << 'EOF'
[Unit]
Description=Phoenixd Lightning Daemon
After=network.target

[Service]
Type=simple
User=ubuntu
ExecStart=/usr/local/bin/phoenixd
Restart=on-failure
RestartSec=10

[Install]
WantedBy=multi-user.target
EOF

# Enable and start
sudo systemctl daemon-reload
sudo systemctl enable phoenixd
sudo systemctl start phoenixd

# Check status
sudo systemctl status phoenixd
Get your phoenixd API password
# Phoenixd generates a password on first startup
cat ~/.phoenix/phoenix.conf
Look for the line:
phoenixd.api-password = YOUR_API_PASSWORD_HERE
Save this password — you’ll need it for LNbits.
Step 2: Set Up LNbits with Docker Compose
LNbits is the accounts layer. It connects to phoenixd and provides multi-wallet management, extensions, and a web UI.
# Create LNbits directory and the docker-compose.yml file
mkdir -p ~/lnbits && cd ~/lnbits
Create the docker-compose.yml by running this command (replace the password first):
cat > ~/lnbits/docker-compose.yml << 'DOCKEREOF'
version: '3.8'

services:
  lnbits:
    image: lnbits/lnbits:latest
    restart: unless-stopped
    ports:
      - "0.0.0.0:5000:5000"
    extra_hosts:
      - "host.docker.internal:host-gateway"
    environment:
      - LNBITS_DATA_FOLDER=/data
      - LNBITS_BACKEND_WALLET_CLASS=PhoenixdWallet
      - PHOENIXD_API_ENDPOINT=http://host.docker.internal:9740
      - PHOENIXD_API_PASSWORD=YOUR_PHOENIXD_PASSWORD_HERE
      - LNBITS_SITE_TITLE=My Lightning Server
      - LNBITS_SITE_TAGLINE=Bitcoin and Freedom Tech
      - LNBITS_ADMIN_EXTENSIONS=true
      - LNBITS_DEFAULT_WALLET_NAME=Main Wallet
    volumes:
      - lnbits_data:/data
    depends_on:
      postgres:
        condition: service_healthy

  postgres:
    image: postgres:16-alpine
    restart: unless-stopped
    environment:
      - POSTGRES_USER=lnbits
      - POSTGRES_PASSWORD=lnbits
      - POSTGRES_DB=lnbits
    volumes:
      - postgres_data:/var/lib/postgresql/data
    healthcheck:
      test: ["CMD-SHELL", "pg_isready -U lnbits"]
      interval: 5s
      timeout: 5s
      retries: 10

volumes:
  lnbits_data:
  postgres_data:
DOCKEREOF
Now edit the password in the file:
# First, grab your actual phoenixd password
PHOENIX_PASS=$(grep phoenixd.api-password ~/.phoenix/phoenix.conf | cut -d= -f2 | xargs)

# Then insert it into the docker-compose.yml
sed -i "s/YOUR_PHOENIXD_PASSWORD_HERE/$PHOENIX_PASS/" ~/lnbits/docker-compose.yml

# Verify it looks right
grep PHOENIXD_API_PASSWORD ~/lnbits/docker-compose.yml
⚠️ If the sed command didn’t work (special characters in password), manually edit:
nano ~/lnbits/docker-compose.ymlThen start the stack:
cd ~/lnbits
docker compose up -d

# Watch the logs until you see "Application startup complete"
docker compose logs -f lnbits
Once it’s running, visit http://YOUR_SERVER_IP:5000 in your browser.
Step 3: Initial Setup — Create Your Admin Account
- Open
http://YOUR_SERVER_IP:5000in a browser - Click “Create an Account”
- Enter a username (e.g.,
admin) and a strong password — do NOT use your Phoenixd password here. LNbits has its own separate login system. - You’re now logged in as the super user
- Copy your User ID — it’s shown in the URL or on your profile page (a long hex string like
a329b75255db4501b54f60319a87036c)
⚠️ Common mistake: Do NOT use the Phoenixd API password to log into the LNbits web UI. The Phoenixd password is only for the backend connection (that’s what
PHOENIXD_API_PASSWORDis for in docker-compose). LNbits maintains its own user accounts — create a separate username and password for the LNbits UI. If you see “missing user ID or access token” at this step, it means you tried to log in with the Phoenixd password instead of creating a fresh LNbits account.
How to Make Yourself Admin
By default, your new account is the super user. But if you want to explicitly set admin privileges, or if you created the account via the API, do this:
# 1. Edit your docker-compose.yml
nano ~/lnbits/docker-compose.yml
In the lnbits service environment section, add this line using your User ID:
- LNBITS_ADMIN_USERS=a329b75255db4501b54f60319a87036c# 2. Save the file (Ctrl+O, Enter, Ctrl+X in nano)
# 3. Restart LNbits with the new config
cd ~/lnbits
docker compose down
docker compose up -dNow when you log in with this account, you’ll see the Admin UI section in the sidebar with access to system settings, audit logs, and monitoring.
Step 4: Install Extensions
LNbits comes with an extension store. From your dashboard:
- Click Extensions in the sidebar
- Browse and install:
- Pay Links (LNURLp) — Create LNURL pay links and Lightning Addresses
- OfflineShop — Sell digital products with automatic delivery
- Events — Sell event tickets with registration
- TPoS — Point-of-sale terminal for in-person payments
- Split Payments — Split incoming payments across wallets
Or install via API:
# Get your admin key from the LNbits UI (Settings > API Info)
ADMIN_KEY=your_admin_key_here

# Install extensions
for ext in lnurlp offlineshop events tpos splitpayments; do
  curl -s -X POST "http://localhost:5000/api/v1/extensions" \
    -H "Content-Type: application/json" \
    -H "X-Api-Key: $ADMIN_KEY" \
    -d "{\"extension\": \"$ext\", \"active\": true}"
done
Step 5: Set Up HTTPS with Caddy (Optional but Recommended)
# Install Caddy
sudo apt install -y debian-keyring debian-archive-keyring apt-transport-https
curl -1sLf 'https://dl.cloudsmith.io/public/caddy/stable/gpg.key' | sudo gpg --dearmor -o /usr/share/keyrings/caddy-stable-archive-keyring.gpg
curl -1sLf 'https://dl.cloudsmith.io/public/caddy/stable/debian.deb.txt' | sudo tee /etc/apt/sources.list.d/caddy-stable.list
sudo apt update && sudo apt install caddy

# Configure reverse proxy
sudo tee /etc/caddy/Caddyfile > /dev/null << 'EOF'
yourdomain.com {
    reverse_proxy localhost:5000
}
EOF

# Replace yourdomain.com with your actual domain
sudo systemctl restart caddy
Caddy automatically provisions a Let’s Encrypt SSL certificate — your LNbits instance will be accessible over HTTPS.
Resources: Connecting BlueWallet to LNbits
⚡ Power User Tip: BlueWallet connects to LNbits through the LNDHub protocol, which LNbits exposes natively — no additional extension needed.
What is BlueWallet?
BlueWallet is a mobile Bitcoin wallet for iOS and Android that supports Lightning Network payments, watch-only wallets, multisig vaults, and — crucially — LNDHub connections to remote Lightning nodes.
How It Works
The connection flow:
- LNbits exposes an LNDHub bridge at
https://your-server.com/lndhub/ext/ - BlueWallet connects to this endpoint using your LNbits wallet credentials
- Once connected, BlueWallet can create invoices, pay invoices, and check balances — without exposing your phoenixd directly
Step-by-Step: Connect BlueWallet
1. Get Your LNDHub Credentials
In your LNbits dashboard:
- Navigate to your wallet (Settings → My Wallets)
- Click your wallet
- Look for the API Info section
- Copy your Invoice/Read Key (starts with
lnbits_...)
2. Configure BlueWallet
- Open BlueWallet on your phone
- Tap ”+” to add a new wallet
- Select “Lightning” → “LNDHub”
- Enter your LNbits server URL:
https://your-server.com/lndhub/ext/ - Login Method: Enter your username and password (the one you set during LNbits setup)
- Tap Save
Alternative: Connect via User ID
If you only have your LNbits User ID:
- Open the login page
https://your-server.com/lndhub/ext/in a mobile browser - Enter your User ID (the long hex string from your profile)
- BlueWallet will generate a link
- Open that link with BlueWallet → wallet is imported
3. Verify the Connection
With the LNDHub bridge active, LNbits acts as a proxy between BlueWallet and your Phoenixd node. BlueWallet creates invoices by talking to LNbits, LNbits forwards them to Phoenixd, and payments arrive in your Phoenixd node. To BlueWallet’s UI, it looks like a native Lightning wallet — balance, transactions, send, and receive all work seamlessly.
Note: For the best experience, keep a small amount of inbound liquidity in your phoenixd node (~100,000 sats) so you can receive Lightning payments reliably.
Troubleshooting
phoenixd won’t start
# Check logs
journalctl -u phoenixd -n 50 --no-pager

# Make sure ~/.phoenix exists and is writable
ls -la ~/.phoenix/
LNbits can’t connect to phoenixd
# Test the connection
curl -s -X POST "http://localhost:9740/getinfo"

# Check LNbits logs
cd ~/lnbits && docker compose logs lnbits
Wrong phoenixd password
# Regenerate the password
cat ~/.phoenix/phoenix.conf | grep phoenixd.api-password
# Update it in docker-compose.yml, then restart
cd ~/lnbits && docker compose up -d
BlueWallet can’t connect
- Verify the URL ends with
/lndhub/ext/ - Make sure HTTPS is working (Caddy logs:
journalctl -u caddy -n 20) - Check that port 5000 is accessible from your server
- Try logging into LNbits web UI first to confirm the server is running
Architecture Summary
The stack flows in one direction: your BlueWallet mobile app connects to LNbits via the LNDHub protocol over HTTPS. LNbits manages wallets, users, and extensions — all backed by PostgreSQL — and routes Lightning payments through Phoenixd, which handles channel management and connects to the broader Lightning Network.
Total Cost
| Item | Cost |
|---|---|
| VPS (2GB RAM, 2 vCPU) | ~$5–6/mo |
| Inbound liquidity in phoenixd | ~50,000–200,000 sats (one-time) |
| Domain (optional) | ~$10–15/yr |
| Total | ~$5–6/mo + your sats |
What’s Next?
With this stack running, you can:
- 🛒 Sell digital products with OfflineShop
- 🎫 Sell event tickets with Events
- 💰 Accept donations with Pay Links (LNURLp)
- 🏪 Run a point-of-sale terminal with TPoS
- 🔗 Create a Lightning Address (yourname@domain.com)
- 📱 Manage everything from BlueWallet on your phone
Built with ❤️ using open source: LNbits · Phoenixd · BlueWallet